
And we’re back with another Test Track! After last edition’s trip down under we’ve got a really in depth look at something many of you will find interesting but perhaps won’t know too much about. Of course we’ve also got a few updates for you in the ever present Development Updates plus there’s a very special item in the New Arrivals section, something the Test Track team have been (not so) patiently waiting for.
We have a feeling this will be a pretty epic edition and we hope you’ll stay with us all the way till the end. So, let’s get started!
Over the last few instalments of Test Track we’ve made the fairly tongue-in-cheek comment that we love showing off Scalextric packaging. Starting with an offhand remark about the bespoke Gulf packaging it became something that we followed up with a few times more, exclaiming in the last edition that we were becoming a bit “obsessed” with showing you boxes. Well, this got us thinking (always dangerous!) and we realised there’s a huge story here, filled with loads of hard work by a number of our colleagues.
While we’ve covered what goes into the model itself, we haven’t discussed what we put the models in. Of course, a large number of solo cars do go straight into the classic Display Case but all our sets, as well as Scalextric specials, like the Legends packs, all use decorated boxes. The work that goes into getting these boxes ready is pretty astounding. So much of the appeal, especially to younger slot racers, will come from the scenes shown on the front of the box. It could be argued that the box often convinces a number of racers to give it a go and I’m sure the picture on the front has often led to slot racers opting for one set over another.
 Some of the boxes our Design team brainstormed
So then, where does this process start? As you could probably have guessed, given that we’re talking about this in Test Track, the Development team get the ball rolling and have to ascertain exactly which models will require artwork (as mentioned, a number of releases will go into the standard Display Case). Once the Dev team knows which SKUs require box artwork, they create a brief with all the major details that need to be included. This mentions exactly what cars should be featured, what’s inside the set plus some guidance on what they would like the box to look like.
Once the brief has been submitted, the designers will look to mock up a very rough idea of what the box should look like, they plan out, approximately, where everything will go and, once everyone is happy with the plan, it can be sent to the artists to work their magic.
Whilst not the only artist involved with Scalextric packaging, Test Track had a chat with world renowned digital artist Adam Tooby, who also works on our sister brand Airfix, about his process in creating artwork. Adam has created a lot of the most recent box fronts and is right at the cutting edge of Scalextric artwork. Here we take a look at what he goes through to create these undeniably impressive works of art.
With the brief, rough plan and vital information supplied, Adam can make a start. Using the CAD data and product artwork, supplied by our Development team, Adam can get up close and start to get a feel for all the detail. Using reference photos (which the Dev team also supply) Adam starts to build up a picture of the cars.
With, on average, about 100 photographs, as well as the Scalextric CAD data, Adam begins construction. Whilst this may differ depending on the artist, Adam starts at the front of the car. It’s the area he is most comfortable with and these early stages are some of the most important. The body structure of the car is built up from this section and, as Adam explained, if you get the front wrong, people will always notice! However, getting this right gives a direction to the artwork and you can really start to get a feel for the geometry of the car.

For Adam, the “eyes” of the vehicle are the lights. These have to be very accurate and are integral to getting the front of the car right. Once the front area of the car is done, Adam will block in the rest of the car’s body.

With the body blocked in, Adam gets to work on the details, working around the body, adding the small parts and components that he can see on the reference photos. Once all the detail has been added, a smoothing modifier is used to make sure that all of the settings applied mesh together and look right.

With the body done, Adam moves onto the wheels. Like the body, the wheels are blocked out and then the details are added.

If applicable, Adam will then get to work on the car interior. Looking closely against all the reference materials, Adam will add the detail, like race seats, and anything else that should be within the car.

The car has really taken shape now and Adam adds the final smoothing detailing.

With the finished model, the next stage is to divide the meshes up into areas that can be unwrapped ready for texturing. This means the car is broken down into parts for mapping. With this the divided car body sections are unwrapped and then put in the UV editor to flatten out and then stitch together, turning the 3D car into a flat 2D pattern. This process gives the car all the coordinates it needs for the mapping process used for when the textures are applied.
Using the UV editor involves placing a small square chequered pattern on the car parts to make sure all the UV coordinates line up. This pattern is used to ensure all the maps have minimal stretching so that the texture won’t look wrong when they’re applied. All areas that need adjusting will be obvious with the stretched chequered pattern.

Once Adam has the unwrapped coordinates for the car, he can now apply the details for all the textures. This is the basis for all the different maps that are required to give the car the correct finish. Usually there are three or four maps used. Normally these are Diffuse (the main colour maps), Specular (a black and white map that reacts with the light when it hits the surface of the model), Gloss (another black and white map that gives off different levels of reflectivity) and the Bump map (a greyscale map that gives the car’s surfaces different depths).
Adam then does a quick test with the car’s graphics on, making sure the artwork is aligned correctly. Any stretching from the UV coordinates is spotted and necessary adjustments made. Once everything has been checked, the final detailed textures can be applied.

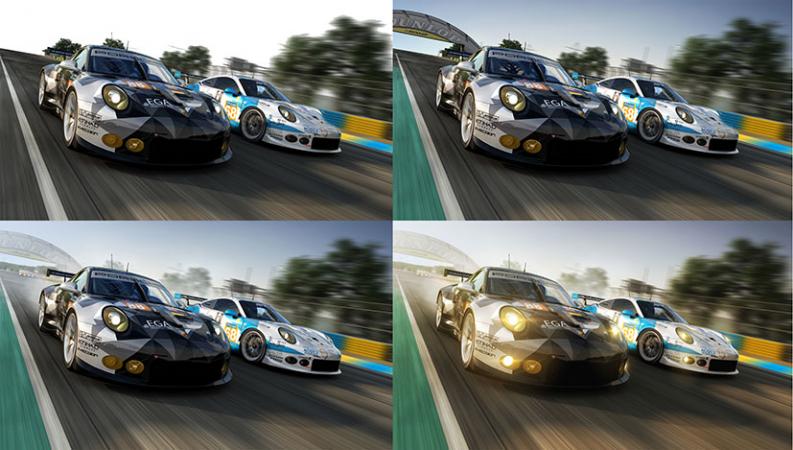
After a quick test render to ensure all the maps are working correctly (and looking nice), the car is suitable for any angle and scene we may use. At this stage, the car is essentially a complete model inside a "digital world". Adam has created a complete 3D representation of the car, meaning that however the scene, angle or lighting is changed, the car is correct and looks real.
Adam must now build the scene itself, deciding on what section of track he’ll use. The track will start being built and all the props and details that’s needed to depict this section. Placing the cars on the scene also gives an indication of how much background detail is required and the car and scene will change depending on the cars modelled.

With the scene being built up, lighting is important. Adam can move the sun around and decide on the best angle to give the best impression of the cars, showing off all the detail.
With the scene and lighting angles fixed, Adam can create a few different “camera” angles to do some rough mock ups for the Designers to pick their favourite. Once one has been selected, Adam will produce the rendering.

Rendering is done in “passes”, which are then put back together in Photoshop. Once in Photoshop Adam has complete control to make the image stand out and prepare it for being on the front of a box. The backgrounds are matte painted in exactly the same way they are in the TV and gaming industry. The wheels are even rendered so they’re going at the correct speed giving the artwork a “hyperreal” feel.

Once the final artwork has been completed in Photoshop it can be sent back to Scalextric where there’s still plenty of work left to do!
The artists will only create the main box image and everything else is the work of our in-house Design department. In fact, our designers are hard at work at the same time as the artists.

With the final image coming, the box is planned out showing all the features, and detailing anything we need to mention on the outside. If you actually take a minute to look at a set box, you’ll see there’s tonnes of information there. All of this, of course, has to be added individually and checked.
When the final artwork from the artist is received, minor amends or changes may be needed but, soon enough, the packaging has come together and just needs to be signed off. Firstly, the Design team will get a Print Proof which will show exactly what the box looks like “in the flesh”. Pretty much every artist and designer will tell you that what you see on the screen isn’t always what you get when it’s printed on paper! The Print Proofs are checked and then checked again, with any changes or amends being worked through and sent back to the printers.

With any amends or changes noted, the Design and Development teams will sign off the artwork and it will be sent for production when the time comes.
The amount of work is truly staggering and we can’t do justice to all of the hours spent in front of a monitor here on Test Track. However, we hope this small window into the process helps you understand and appreciate the packaging that the Designers and artists slave over. Who knows, this may even lead you to spend a few minutes looking at the box with your next Scalextric purchase!

One of our in-house design team hard at work
It’s been somewhat of a quiet month for the Development team but we still have a few updates to tell you about. Up first is the Craig Lowndes 100th Race Win Twin Set (C3815A), which we briefly mentioned last time out. These cars, like before, are available only from Australian retailers and we recommend you contact your nearest shop, if you’re based in Australia, or contact a distributor for further details if outside of Australia.

As you can see, the special Gold car displays all of Craig’s wins, offering a fantastic memento to Craig’s fantastic achievement.

We also wanted to show you the Signed Sample from the BTCC BMW 125 (C3784). Not too much has changed since we exclusively showed you the Decoration Sample, but it’s really any excuse to show you these fantastic BTCC cars that I know a lot of you are waiting for.


There’s also the Track Day ARC AIR Set (C1358), which we have the Signed Sample for. In fact, we’ve had this for a little while but we wanted to hold off showing it to you as there’s a few other exciting ARC-related things to tell you about.


Many of you will have already seen that we’ve launched a new guide on how to update the firmware for your ARC powerbase using a different app. This allows you to take advantage of the continuing work our Development team are doing to improve the app without sending your powerbase back to us. This is definitely a big step forward and for any of you that haven’t taken the plunge with either ARC ONE or AIR, this might be another line to add in the ‘Pro’ list (pun intended!).
There is another video for Android users so don’t fret if you’re not using an Apple device. Just head on over to our YouTube Channel for the Android video guide.
Alongside this incredibly useful update, we’ve also had a bit of a tidy up on the website for ARC. Now, if you search ‘ARC’, you'll have all the information you need in one place. This page is a destination for all things ARC and we hope you’ll be using it for all your ARC needs!

To finish our Development Updates “on topic” we have the other Quick Build car to show off. The Hot Rod (C3708) should be another car popular with our younger racers and we’re sure they’ll have fun smashing the cars to pieces (and with these cars they can go back together again!).


We hope you’re hanging in there because as we finish up here we have a very special new arrival this month. Announced in our first edition, all the way back in July 2015, the Touring Car Legends Twinpack (C3693A) is now available. We were thrilled to be able to bring you this amazing announcement to kick off our Test Track blog and we’ve followed this release at almost every major stage.
It was truly fascinating to see this project progress and the way so many of you took to these cars, and the news, was a joy to watch. We’re sure you won’t be disappointed and we’d love to see you running and using these cars when you receive them. Share any photos via Facebook, Twitter or over on our Forum and we’ll look to feature some in the next Test Track.
Here’s ours in the office doing a few laps on our small layout, enjoy!
Let’s take a trip down memory lane and remind ourselves how the Sierra RS500 and BMW M3 progressed through Test Track.
Announced to put Test Track on the map, we surprised many of you with the launch of this unique online blog and the news that these popular cars were in the works. Starting off with the CAD data and Rapid Prototypes, the beginnings of these popular slot cars could be seen.

It was only the month after that we showed off the First Shots from the tooling and the cars really started to come to life.

The following edition at the end of September showed the Final Engineering Prototype for the Ford Sierra RS500.

It was then a bit of a wait as we jumped to the Signed Sample in the ARC AIR special at the start of February. We would have loved to have shown you more but we hope you still feel as connected to these cars as we are. It’ll be great to see them out there soon with loving homes and, hopefully, topping some podiums!

Just before we finish up there’s also a few other cars that have arrived that might take your fancy. With the Sierra RS500 in the Twinpack there’s also the Ford Sierra RS500 from Brands Hatch 1990 (C3781) as driven by Robb Gravett in Round 13 of the BTCC.

Always popular with collectors and slot racers alike, we have the McLaren P1 in an incredibly striking green (C3756).

There's also a new Extension Pack (C8554) which contains eight x C8205 Straights. Useful and cost effective for anyone looking to extend their layout!

Lastly, it was no coincidence that we showed you the MINI Challenge Set (C1355) earlier. This set is due out very soon (which means it definitely counts as a new arrival!) and we thought you might like to see this video we made just for it!
Happy Racing!
The Test Track Team
© Hornby Hobbies Ltd. All rights reserved.